Getting Started
Install
Install the SDK from PyPI. The example is shown with your virtual environment active.
(.venv) % python -m pip install jamf-pro-sdk
Install Locally
Install locally into your virtual environment. You must first clone the SDK repository. The example is shown with your virtual environment active.
(.venv) % python -m pip install /path/to/jamf-pro-sdk-python
When running pip freeze the SDK will appear with a filepath to the source instead of the version.
(.venv) % pip freeze
...
jamf-pro-sdk @ file:///path/to/jamf-pro-sdk-python
...
Create a Client
Create a client object using an API Client ID and Client Secret - the recommended method for authentication:
Important
Breaking Change: As of version 0.8a1, the SDK no longer uses BasicAuthProvider objects. Use ApiClientCredentialsProvider as the new default.
Basic authentication is now disabled by default in Jamf Pro. To authenticate securely and ensure compatibility with future Jamf Pro versions, use an API Client for access tokens instead.
>>> from jamf_pro_sdk import JamfProClient, ApiClientCredentialsProvider
>>> client = JamfProClient(
...     server="jamf.my.org",
...     credentials=ApiClientCredentialsProvider("client_id", "client_secret")
... )
>>>
Note
When passing your Jamf Pro server name, do not include the scheme (https://) as the SDK handles this automatically for you.
Choosing a Credential Provider
There are a number of built-in Credentials Providers available. To learn how to implement your own visit Custom Credentials Providers.
We recommend using API Clients for most cases. Basic authentication via username and password is now considered a legacy method and is disabled by default in Jamf Pro versions ≥ 10.49.
Use
ApiClientCredentialsProviderfor API Clients.Use
UserCredentialsProviderif enabled in your Jamf environment.
Important
Do not use plaintext secrets (passwords, clients secrets, etc.) in scripts or the console. The use of the base UserCredentialsProvider class in this guide is for demonstration purposes.
Credential Provider Utility Functions
The SDK contains three helper functions that will return an instantiated credential provider of the specified type. When leveraging these functions, ensure you have the required extra dependencies installed.
When using load_from_keychain, you must provide the identity keyword argument required by the specified provider:
username=forUserCredentialsProviderclient_id=forApiClientCredentialsProvider
Prompting for Credentials
>>> from jamf_pro_sdk import JamfProClient, ApiClientCredentialsProvider, prompt_for_credentials
>>> client = JamfProClient(
...     server="jamf.my.org",
...     credentials=prompt_for_credentials(
...         provider_type=ApiClientCredentialsProvider
...     )
... )
API Client ID: 123456abcdef
API Client Secret:
Loading from AWS Secrets Manager
Important
The aws dependency is required for this function and can be installed via:
% python3 -m pip install 'jamf-pro-sdk[aws]'
The SecretString is expected to be a JSON string in the following format:
// For UserCredentialsProvider:
{
    "username": "oscar",
    "password": "******"
}

// For ApiClientCredentialsProvider:
{
    "client_id": "abc123",
    "client_secret": "xyz456"
}
>>> from jamf_pro_sdk import JamfProClient, ApiClientCredentialsProvider, load_from_aws_secrets_manager
>>> client = JamfProClient(
...     server="jamf.my.org",
...     credentials=load_from_aws_secrets_manager(
...         provider_type=ApiClientCredentialsProvider,
...         secret_id="arn:aws:secretsmanager:us-west-2:111122223333:secret:aes128-1a2b3c"
...     )
... )
Loading from Keychain
Important
This utility requires the keyring extra dependency, which can be installed via:
% python3 -m pip install 'jamf-pro-sdk[macOS]'
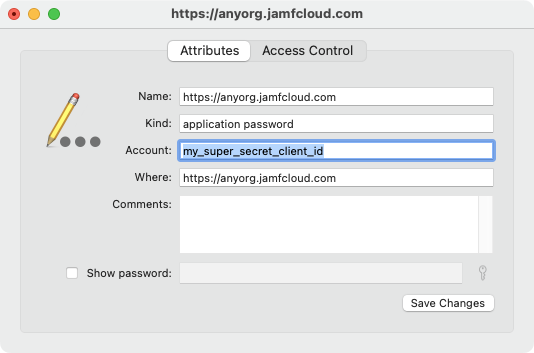
When using ApiClientCredentialsProvider, the SDK expects:
The API client ID to be stored in the keychain under your Jamf Pro server name (as the service_name) with the client ID as the username, and its associated secret as the password.
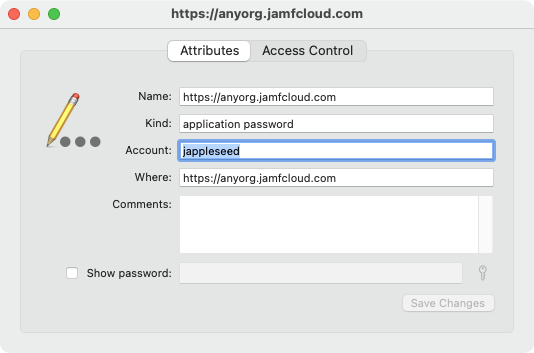
When using UserCredentialsProvider, the SDK expects:
A username to be passed, and the password to be retrieved from the keychain under the same server name and username.
Note
The server argument should not include the scheme. The SDK normalizes this internally.
Use the appropriate keyword argument depending on the credential provider class:
Use
client_id=when usingApiClientCredentialsProvider.Use
username=when usingUserCredentialsProvider.
>>> from jamf_pro_sdk import JamfProClient, ApiClientCredentialsProvider, load_from_keychain
>>> client = JamfProClient(
...     server="jamf.my.org",
...     credentials=load_from_keychain(
...         provider_type=ApiClientCredentialsProvider,
...         server="jamf.my.org",
...         client_id="<client_id_here>"  # Required keyword
...     )
... )
>>> from jamf_pro_sdk import JamfProClient, UserCredentialsProvider, load_from_keychain
>>> client = JamfProClient(
...     server="jamf.my.org",
...     credentials=load_from_keychain(
...         provider_type=UserCredentialsProvider,
...         server="jamf.my.org",
...         username="<username_here>"  # Required keyword
...     )
... )
Tip
You can manage entries using the Keychain Access app on macOS. See: Apple’s Keychain User Guide.
Access Tokens
On the first request made the client will retrieve and cache an access token. This token will be used for all requests up until it nears expiration. At that point the client will refresh the token. If the token has expired, the client will use the configured credentials provider to request a new one.
You can retrieve the current token at any time:
>>> access_token = client.get_access_token()
>>> access_token
AccessToken(type='user', token='eyJhbGciOiJIUzI1NiJ9...', expires=datetime.datetime(2023, 8, 21, 16, 57, 1, 113000, tzinfo=datetime.timezone.utc), scope=None)
>>> access_token.token
'eyJhbGciOiJIUzI1NiJ9.eyJhdXRoZW50aWNhdGVkLWFwcCI6IkdFTkVSSUMiLCJhdXRoZW50aWNhdGlvbi10eXBlIjoiSlNTIiwiZ3JvdXBzIjpbXSwic3ViamVjdC10eXBlIjoiSlNTX1VTRVJfSUQiLCJ0b2tlbi11dWlkIjoiM2Y4YzhmY2MtN2U1Ny00Njg5LThiOTItY2UzMTIxYjVlYTY5IiwibGRhcC1zZXJ2ZXItaWQiOi0xLCJzdWIiOiIyIiwiZXhwIjoxNTk1NDIxMDAwfQ.6T9VLA0ABoFO9cqGfp3vWmqllsp3zAbtIW0-M-M41-E'
>>>
Both the Classic and Pro APIs are exposed through two interfaces:
>>> client.classic_api
<jamf_pro_sdk.clients.classic_api.ClassicApi object at 0x10503d240>
>>> client.pro_api
<jamf_pro_sdk.clients.pro_api.ProApi object at 0x10503c9d0>
>>>
Continue on to Classic API or the Pro API.
Configuring the Client
Some aspects of the Jamf Pro client can be configured at instantiation. These include TLS verification, request timeouts, retries, and pool sizes. Below is the SessionConfig object used to customize these settings:
- pydantic model SessionConfig
Jamf Pro client session configuration.
- Parameters:
timeout (int) – HTTP request timeout (defaults to no timeout set).
max_retries (int) – HTTP request retries (defaults to 0).
max_concurrency (int) – The maximum number of HTTP connections the client will create when making concurrent requests (defaults to 5).
return_exceptions – Global setting that controls returning exceptions when
concurrent_operations()is invoked. Setting this toTruewill return the exception object if an error is encountered by thehandler. IfFalseno response will be given for that operation.user_agent (str) – Override the default
User-Agentstring included with SDK requests.verify (bool) – TLS certificate verification (defaults to True).
cookie (str | Path) – A path to a text cookie file to attach to the client session.
ca_cert_bundle (str | Path) – A path to a CA cert bundle to use in addition to the system trust store.
scheme (str) – Override the URL scheme to http (defaults to https). It is strongly advised that you use HTTPS for certificate verification.
Note
The max_concurrency setting is used with the SDK’s concurrency features. Those are covered in Performing Concurrent Operations.
The Jamf Developer Guide states in scalability best practices to not exceed 5 concurrent connections. Read more about scalability with the Jamf Pro APIs here.
The Jamf Pro client will create a default configuration if one is not provided.
>>> from jamf_pro_sdk import JamfProClient, ApiClientCredentialsProvider, SessionConfig
>>> config = SessionConfig()
>>> config
SessionConfig(timeout=None, max_retries=0, max_concurrency=5, verify=True, cookie=None, ca_cert_bundle=None, scheme='https')
>>>
Here are two examples on how to use a SessionConfig with the client to disable TLS verification and set a 30 second timeout:
>>> config = SessionConfig()
>>> config.verify = False
>>> config.timeout = 30
>>> config
SessionConfig(timeout=30, max_retries=0, max_concurrency=5, verify=False, cookie=None, ca_cert_bundle=None, scheme='https')
>>> client = JamfProClient(
...     server="jamf.my.org",
...     credentials=ApiClientCredentialsProvider("client_id", "client_secret"),
...     session_config=config,
... )
>>>

>>> config = SessionConfig(**{"verify": False, "timeout": 30})
>>> config
SessionConfig(timeout=30, max_retries=0, max_concurrency=5, verify=False, cookie=None, ca_cert_bundle=None, scheme='https')
>>> client = JamfProClient(
...     server="jamf.my.org",
...     credentials=ApiClientCredentialsProvider("client_id", "client_secret"),
...     session_config=config,
... )
>>>
Warning
It is strongly recommended you do not disable TLS certificate verification.
Logging
You can quickly setup console logging using the provided logger_quick_setup() function.
>>> import logging
>>> from jamf_pro_sdk.helpers import logger_quick_setup
>>> logger_quick_setup(level=logging.DEBUG)
When set to DEBUG the stream handler and level will also be applied to urllib3’s logger. All logs will appear
If you require different handlers or formatting you may configure the SDK’s logger manually.
>>> import logging
>>> sdk_logger = logging.getLogger("jamf_pro_sdk")